Introduction
Proper placement of a composite can provide the highest esthetic benefits, minimal tooth preparation requirements, and predictable clinical success in today’s early clinical application. The technique, however, can appear to be quite involved to the novice, with a number of critical nuances involved including moisture control, adhesion techniques, incremental placement and finishing. These steps, if performed early, are paramount as a single procedural mistake or mistake of isolation or layering can affect the durability, esthetic results and efficacy of the completed restoration. Enabling young clinicians to sense not only the how but the why of each phase helps to ensure their confidence and consistency in clinical practice.
This step-by-step, systematic guide takes you through the careful preparation, placement, and polishing of composite restorations, focusing on technique and clinical judgement. It provides a “repeated and systematic” ladder to get from theory to practice for an aspiring beginning tennis player. A second popular option, composite resin restorations, offers an in-depth look at indications, benefits and clinical applications of composite resin in addition to it as a reference. The steps involved in restoring teeth are too complex to perform without caution and lack of comprehensive knowledge.When young professionals perform a restoration on their own without any documentation, there are various common pitfalls they will tend to make and the quality and longevity of their restorations will suffer.
Designate a specific time to prepare and then assess the clinical process.
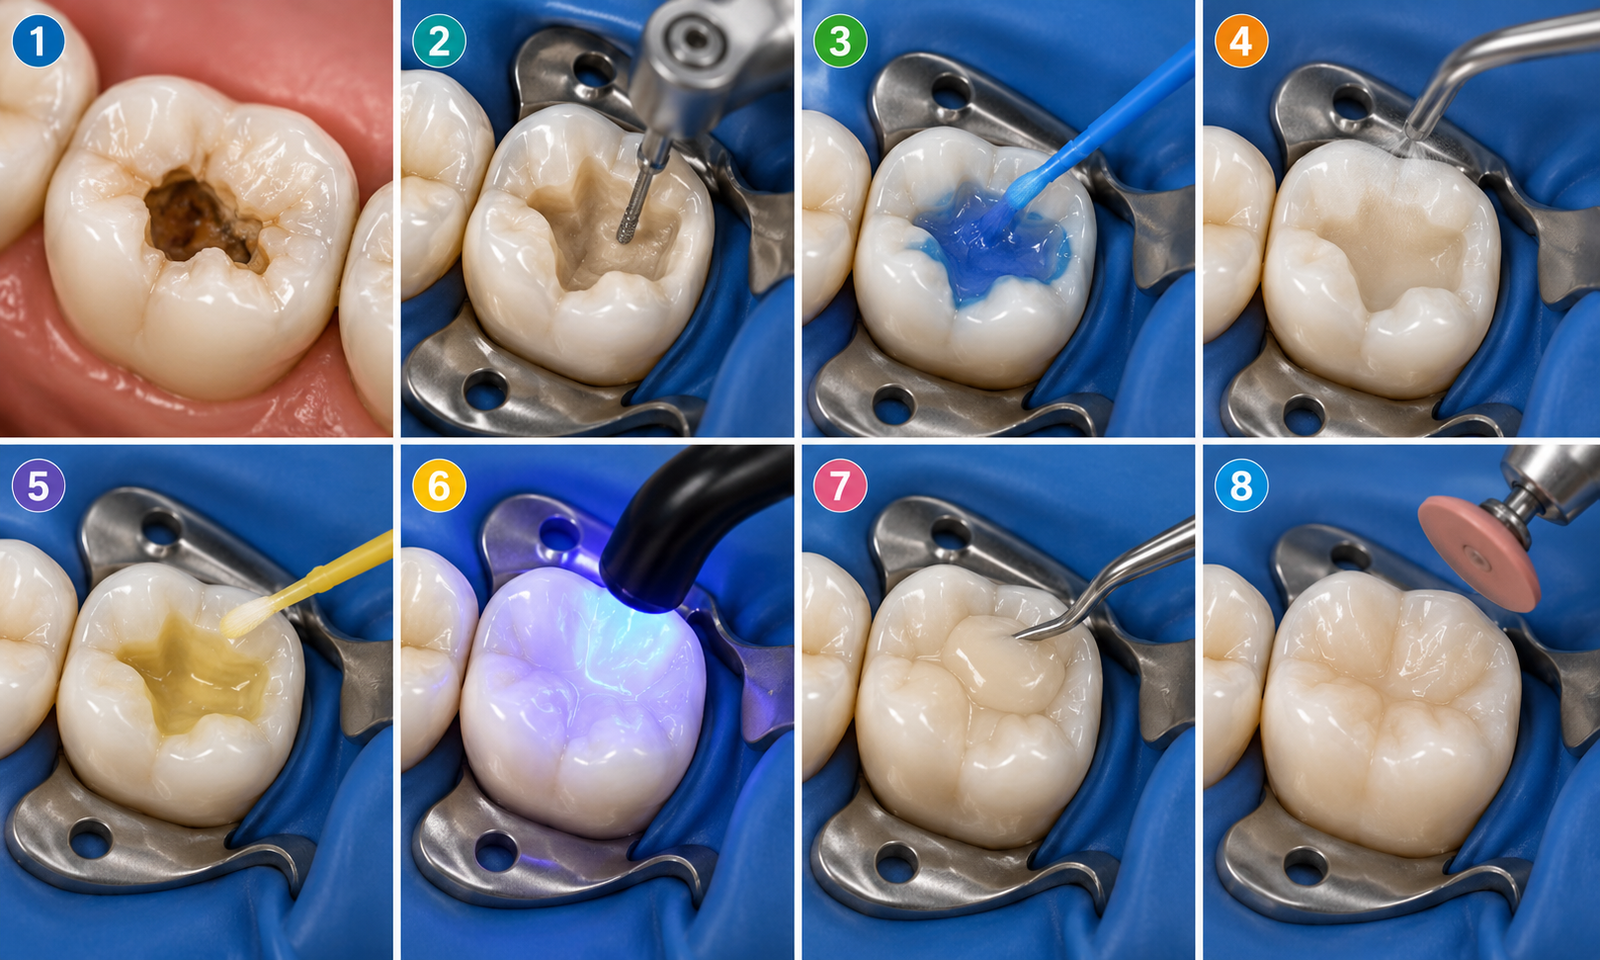
The key to a successful composite restoration actually starts before the material is placed. An accurate diagnosis, case selection and clinical evaluation of the caries process, occlusion and tooth structure is a crucial part of proper preparation. This step is usually overlooked by the beginners who rush only on the cavity design and foreboy of perfect execution. Some of the restorative failures can be attributed to this as well if the cavity execution is flawless. Whether a direct composite is suitable will depend upon several factors including moisture control (is it possible when using a direct composite?), cavity size, occlusal loading, and the esthetic requirements. To assess the depth of decay and proximity to the pulp, radiographic assessment and careful visual-tactile examination is imperative.
After the decision has been reached to place a composite restoration, the next most important step is isolation. Rubber dam isolation is recommended and will offer the best moisture control, visibility and bonding reliability. A major cause of an adhesive failure, especially for novices, is contamination of saliva. Well cleaned teeth with pumice and a water slurry also provide good bond surface conditions by helping to remove plaque and pellicle. The selection of shade should be done prior to the occurrence of tooth dehydration, or the results will be a lighter shade and may affect the matching of restorations. This is a stepping-off and should not be rushed.
Principles of Cavity Preparation & Conservation of Tooth Structure
Basic principles of cavity preparation for composite resin restorations include minimal intervention dentistry; that is, only decayed or irreversibly damaged sound dentin and enamel should be removed. Adhesion forms are not required in extensive quantities as with traditional amalgam preparations since the composite preparations are formed through bonding systems. This enables for a more conservative and biologically-friendly cavity design. The emphasis for beginners should be placed on removing caries effectively and the line angles should still be rounded and smooth to allow for a reduction in stress concentration and ease of adaptation of the restorative material.
Use of high speed rotation and slow speed – tool for caries removal is common and effective. It should be noted that the preparation should not be over extended, particularly in sound enamel. After caries removal, wall surfaces of the cavity should be examined for remaining infected dentin and shaped (refined) as needed. Beveling margins of the enamel is one of the most recommended criteria on anterior restorations for bonding purposes, as well as for esthetics’ purposes to help harmonize the restoration with the surrounding tooth structure. Beveling however should be employed with care in posterior load bearing areas. A correct cavity design is important to the success of the restoration, marginal integrity and polymerization adaptation.
Analyse Strength of Adhesive Force and Bonding Technique
Bonding is the more technically challenging stage of composite restoration and the most important step that is crucial for retention and the marginal seal. Generally, modern adhesive systems can either be etch-and-rinse or self-etch, procedures that are both designed to establish micromechanical bonding between the tooth structure and resin. In the etch-and-rinse method, phosphoric acid is applied to enamel and dentin surfaces to eliminate smear and to demineralize the surface so that resin can infiltrate the surface. Dentin etching time must be followed strictly for beginners, as the weak formation of the hybrid layer, with potential postoperative sensitivity, will be a result of over-etching.
Following etching, the tooth needs to be properly rinsed and air-dried, but not so much that the collagen in the dentin is removed and the network collapses, which would reduce bonding. The adhesive is then applied to the surface of the tooth and is actively rubbed into the surface to help penetrate the adhesive, and is gently air thinned to remove solvents to achieve equal adhesive thickness over the surface of the tooth. Its light curing should be done following manufacturer’s instructions with regard to the intensity and duration of the curing spectrum for proper polymerization. All of these must be done accurately, because it is often impossible to join wrong bonds once the composite is in place.
What is the best way to start place-ing?
In order to gain control over the polymerization shrinkage, to facilitate adaptation and to ensure the highest aesthetic outcomes in restorations involving composite materials, incremental layering technique is necessary. As opposed to bulk application, composite material is applied in layers of 2 mm or less and is cured in layers. By using this technique, there is less of an internal stress with the restoration and less chance of any gaps or postsensitivity. Beginners should start by replacing the deeper dentin and work their way up to replacing the enamel system and work systematically building an approach.
The individual layers of composite involved should be designed to fit the cavity walls/roof and not be allowed to trap air pockets with the use of the right instruments. Sculpturing should replicate that of the natural tooth, such as that of cuspal inclines, marginal ridges and grooves on the occlusal surfaces, where applicable. Completing the cure of each increment is important; if it is not completed, the strength and wear performance may not be satisfied. Flowable composite can be used as an initial liner to improve adaptation to the internal cavity in deeper cavities, however a more robust hybrid composite may be recommended to provide functional stability over the flowable. Understanding layering technique is a very important step in Clinical Confidence.
Completing and polishing for durability and appearance
The finishing and polishing aspects of composite restorations are typically overlooked but crucial for achieving smooth surfaces, proper occlusion and long-term durability. The restoration must be thoroughly checked for excess material, interferences and overhangs after final curing. Finishing is used to refine anatomy and contour, and involves further shaping of the restoration with either the diamond burs or carbide instruments. Be careful not to remove too much material or mar the margin because that will affect the seal and esthetic contours of the restoration.
Polishing is performed after finishing, with the use of progressively finer abrasive systems which include polishing disc, rubber points or polishing pastes. The aim of a high gloss surface is to make it extremely easy for plaque to build up on the surface, minimizing the ability of plaque to stain, and closely mimicking the look of natural enamel. The confocal surface of composite enhance esthetics and also play a positive role concerning the health of the periodontium (reducing the surface roughness which can provide bacterial biofilm). Check occlusion on static and dynamic movements for proper restoration to not impede with normal function. Good finishing and polishing reagents greatly enhance the life of the cement and help the patient realize the results that will make his/her relationship with the dentist pleasant.
Common challenges and practical tips for first timers
The common issues for beginners in creating a composite resin restoration typically involve issues with one layer contaminating the other with moisture, achieving an appropriate shade match, voids, or insufficient curing. Loss of isolation during the procedure is one of the most important factors to be taken into consideration, and is known to have a significant effect on bonding performance. It is not an option to keep a field damp during the entire operation. Another frequent problem is bad incremental placement which can result in shrinkage stress and marginal failure. It’s important to establish discipline in small, manageable steps.
Another common problem is shade mismatch, which can occur when the wrong shade is chosen when lighted from artificial sources and also when not taking account of tooth dehydration. When possible shade should be selected in place of the rubber dam. Furthermore, improper light placement or insufficient curing devices will result in easy-to wear and fast-to discolour soft weak restorations. In order to avoid problems with lighting the curing chamber, beginners should regularly monitor the intensity of the lights and make sure to use the correct angulation during the polymerization process. Deep knowledge of each of these challenges, along with continued practice and focus on detail while following standardized procedures, results in gradually improving clinical outcomes. composite resin restorations.