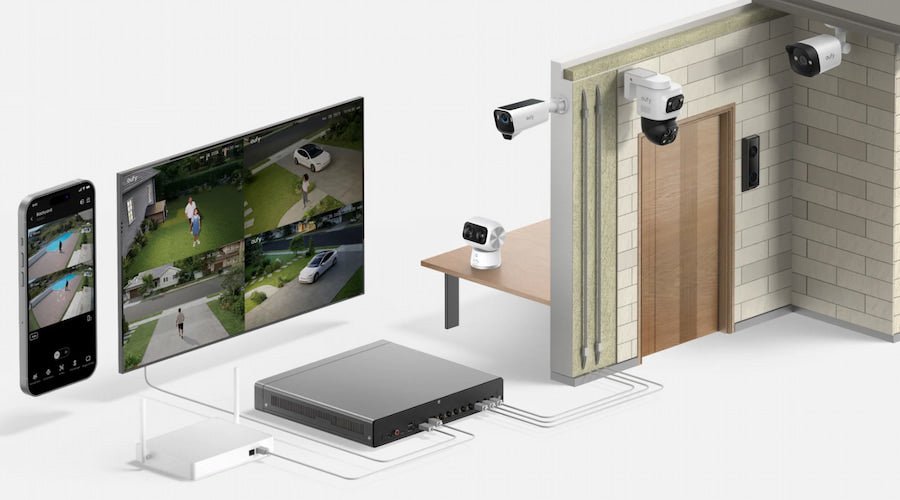
A single doorbell camera tells you who walked up to your front step. It does not tell you who circled the side gate at two in the morning, whether the shed door was open before the tools went missing, or what happened in the driveway while you were away for a fortnight. Once a property has more than one blind spot, a collection of standalone cameras starts to feel like a patchwork rather than a security plan.
That is the point where most people begin looking at a recorder-based setup. Wiring cameras back to a central unit sounds intimidating, and the product pages rarely explain what actually matters once the boxes are open. Resolution numbers get top billing while the decisions that determine whether your footage is usable months later go unmentioned.
This guide walks through the practical side: how local recording differs from cloud-only cameras, how to plan cabling before you make a single hole in a wall, how to match camera types to the areas you actually need to watch, and how to size storage so the clip you need has not already been overwritten.
Why Local Recording Changes What Your Cameras Can Do
Wireless cameras that upload to the cloud are built around events. Something triggers the sensor, a clip records, and that clip goes online. It works well for a front door, but the model has gaps. Motion that starts before the sensor fires gets clipped. Battery cameras sleep between events. And when the internet drops, so does your recording.
A recorder-based setup inverts that. Cameras stream continuously to a box sitting in your home, and the recording happens whether or not your connection is up. That single difference is why an NVR security system tends to be the choice for properties with driveways, side access, garages, or outbuildings, where the useful footage is often the ten seconds before anything obvious happens.
Continuous recording also changes how you use the footage. Instead of scrubbing through dozens of disconnected clips, you get a timeline. If a package went missing sometime between Tuesday afternoon and Wednesday morning, you can move through that window directly rather than hoping a clip exists at the right moment.

How PoE Wiring Actually Simplifies Installation
The phrase “wired system” makes people picture electricians and torn-up walls. In practice, Power over Ethernet removed most of that work. A single network cable carries both the video signal and the power to each camera, so there is no separate power adapter at the camera end and no need for an outdoor outlet near every mounting point.
This matters most in the places that are hardest to cover. Soffits, gable ends, and garage corners rarely have power nearby, and running mains cable to them is a job for a licensed tradesperson. Running a network cable is something a reasonably confident homeowner can manage in an afternoon. Brands like eufy build their NVR kits around PoE for this reason, shipping the cameras with cable lengths sized for typical residential runs.
The other benefit is stability. Wi-Fi cameras compete with phones, laptops, and streaming devices for bandwidth, and a camera mounted behind a brick wall two floors from your router will drop frames no matter how good the sensor is. A cabled connection removes that variable entirely, which is the difference between footage you can rely on and footage you discover was missing on the day you needed it.
Planning Cable Runs Before You Drill
Spend an hour on this and you will save yourself a weekend. Walk the property and mark every position you want covered, then trace a plausible path from each one back to where the recorder will sit. Attics, crawl spaces, and existing conduit runs do most of the work.
Measure each run and add roughly a third for slack, bends, and the inevitable route you did not anticipate. Cables that finish two metres short are the most common reason installations stall halfway through. Choose a recorder location that is dry, ventilated, near your router, and not somewhere an intruder would look first, which rules out the entry hallway and the garage shelf by the door.

Matching Resolution and Camera Type to Each Zone
Resolution is the specification everyone compares and the one most often misapplied. What determines whether you can read a number plate is not the megapixel count alone but how many of those pixels land on the object. A 4K camera watching a wide back garden may give you less usable detail on a face than a 2K camera aimed down a narrow side path, simply because the second one is covering less ground.
The practical approach is to decide what each position needs to accomplish. Identification zones, meaning the front door, the driveway entrance, and any gate a person must pass through, deserve the highest resolution and the tightest field of view you can arrange. Overview zones such as the back garden or a large forecourt need coverage more than detail, and a wider lens at moderate resolution serves them better.
Night performance deserves equal weight. A camera that resolves beautifully at midday and produces a grey smear under a streetlight has not solved your problem, since most incidents happen after dark. Look for colour night vision or integrated spotlights on the positions where identification matters, and accept infrared on the overview positions where you only need to know that something moved.
Where Pan-and-Tilt Earns Its Place
A pan-tilt-zoom camera covers ground that would otherwise need two or three fixed units, which makes it well suited to a large open area with a single good mounting point. It can follow movement across a yard and zoom in on detail that a fixed lens would render as a handful of pixels.
The trade-off is that a moving camera is only pointing one direction at a time. If it has tracked a cat across the lawn, it is not watching the gate. The sensible pattern is a PTZ unit for broad coverage paired with fixed cameras locked onto the entry points that must never go unwatched.

Sizing Storage So the Footage Is Still There
Retention is the quiet failure point of home surveillance. People discover a problem days or weeks after it happened, and the recording has already been overwritten. Working out your retention window before you buy the drive avoids that outcome.
Three factors set how long footage survives: the number of cameras, the resolution each one records at, and whether they record continuously or only on detected events. A four-camera setup recording continuously at high resolution consumes storage far faster than the same four cameras recording only when something moves. Most recorders let you mix the two, and that flexibility is worth using.
A reasonable configuration for a home is continuous recording on entry points where timeline context matters, and event-based recording on overview positions where nothing happens for days at a stretch. Aim for at least two weeks of retention, and closer to a month if you travel. If the drive that ships with your system gives you less than that, upgrading it at install time is far easier than swapping it out later.

Tuning Detection So You Keep Paying Attention
An installation that sends forty notifications a day gets muted within a week, and a muted system is not protecting anything. The first task after the cameras are mounted is cutting the false alarms down to something you will actually read.
Start by drawing detection zones that exclude the street, the footpath, and any neighbouring driveway. Then enable subject filtering so the system distinguishes people and vehicles from foliage, rain, and passing animals, and set alerts only for the categories that matter at each position. Cameras that run this analysis on the device rather than in the cloud respond faster and keep the footage local, which is worth checking before you commit.
Finish by testing rather than assuming. Walk each approach to the property at night and confirm you get an alert, that the footage is clear enough to identify someone, and that the timeline has no gaps. Repeat that check every few months, because lenses collect dust and shrubs grow into frame.
Turning Coverage Into Confidence
A recorder-based setup earns its keep through planning rather than specifications. The cabling walk you do before drilling determines whether the install goes smoothly. The decision about what each camera position needs to accomplish determines whether the footage is usable. The retention window you choose determines whether the clip still exists when you go looking for it. And the detection tuning determines whether you are still paying attention a month later.
None of these steps require specialist skills. They require sitting down with a rough sketch of the property and answering honest questions about where you are exposed and what you would want to see afterwards. Get those answers right, and the hardware choices largely make themselves.
Start with the positions you already worry about, build the cabling plan around them, and expand once the first cameras are proving useful. A system that covers three approaches properly beats one that covers eight badly, every time.