Introduction
An
automatic edging machine is a multi-functional fully automatic lens edger which
is able to process both glass and plastic lenses. It is designed for highly
efficient edging operation, easy to operate and gives precision control on lens
size and shape.
automatic edging machine is a multi-functional fully automatic lens edger which
is able to process both glass and plastic lenses. It is designed for highly
efficient edging operation, easy to operate and gives precision control on lens
size and shape.
An
automatic lens edger helps to increase edging productivity, as well as
flexibility through fast, accurate edging of simple and complex edge types. It
help in the efficient and fast production of straight bevels, inclined bevels, rimless
with drills, grooves, and polishing in addition to T-bevels and steps backs.
With the automatic edging machine, even the most complicated jobs are easily
edged.
History of automatic edging machine
The automatic edging machine was invented in
September 1953 and in July 25th 1967 and was granted patent right in
the United State in July 25th 1967 with Patent No 3,332172. In 2006,
the automatic edging machine enabled the most delicate jobs to be carried out
comfortably with customized setting.
September 1953 and in July 25th 1967 and was granted patent right in
the United State in July 25th 1967 with Patent No 3,332172. In 2006,
the automatic edging machine enabled the most delicate jobs to be carried out
comfortably with customized setting.

Diagram
direction:
(1) outer cover (voice-proof)
(2) water-proof inner cover
(3) head pressure adjusting knob
(4) the head
(5) the sensor of head base(cursor)
(6) lens chuck
(7) power switch
(8) wheels
(9) horizontal adjustment foot
(10) operation panel
direction:
(1) outer cover (voice-proof)
(2) water-proof inner cover
(3) head pressure adjusting knob
(4) the head
(5) the sensor of head base(cursor)
(6) lens chuck
(7) power switch
(8) wheels
(9) horizontal adjustment foot
(10) operation panel
Operation procedure of automatic edging machine
A. Preparations
a. Turn
power switch on and open water supply cock.
power switch on and open water supply cock.
b. Press
(TEST)switch and check that water is supplied
(TEST)switch and check that water is supplied
B.
Fitting
template
Fitting
template
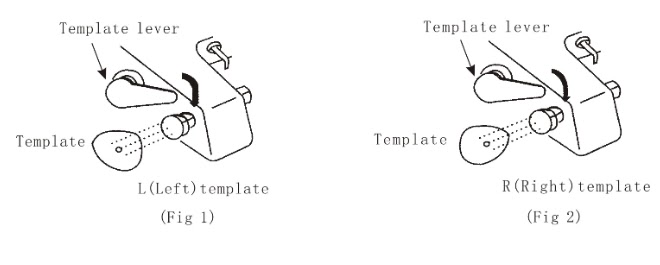
·
Fix up a template as illustrated in Fig. 1 and Fig.
2 above
·
Put left and right template as illustrated in Fig.
1 and Fig. 2 above.
Put left and right template as illustrated in Fig.
1 and Fig. 2 above.
A. Fix the lens
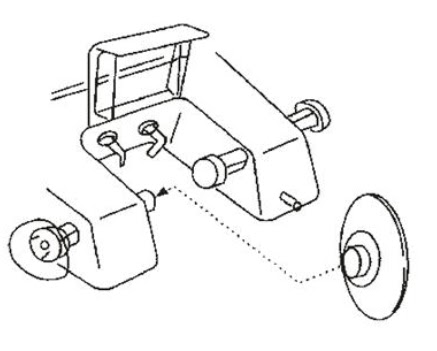
Match the upper point of sucker with the one of the shaft as in Fig. 3
above.
above.
A. Clamping
lens
lens
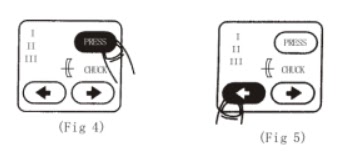
Select lens clamping with PRESS button as shown in Fig. 4
·
Select
clamp pressure
Select
clamp pressure
a.
(low):
For high refractive glass lens
(low):
For high refractive glass lens
b.
(medium):
For glass lens and Columbia Resin (CR)
lens
(medium):
For glass lens and Columbia Resin (CR)
lens
c.
(high):
For CR lens
(high):
For CR lens
·
Clamp the lens with chunk button
Clamp the lens with chunk button
·
When
pressed lightly one time, it automatically clamp lens
When
pressed lightly one time, it automatically clamp lens
·
When
relax button lightly, clamp will loosen lens
When
relax button lightly, clamp will loosen lens
A.
Selecting lens
Selecting lens
·
Press
lens selector button to select glass lens or CR lens
Press
lens selector button to select glass lens or CR lens
NOTE: It is initially set as GL lens mode when turn on power switch
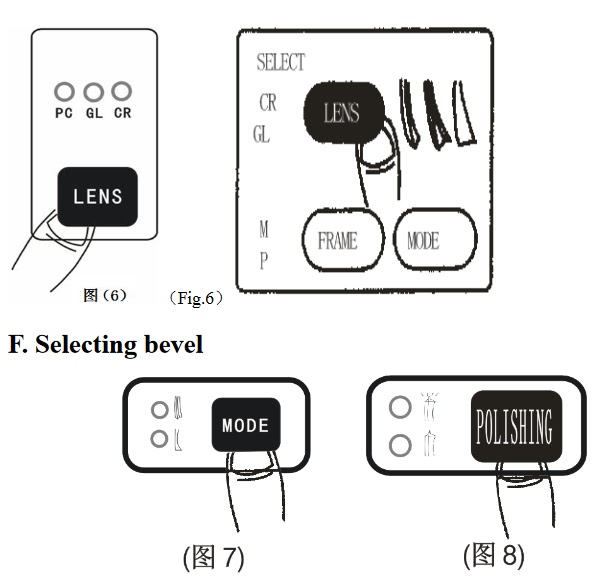
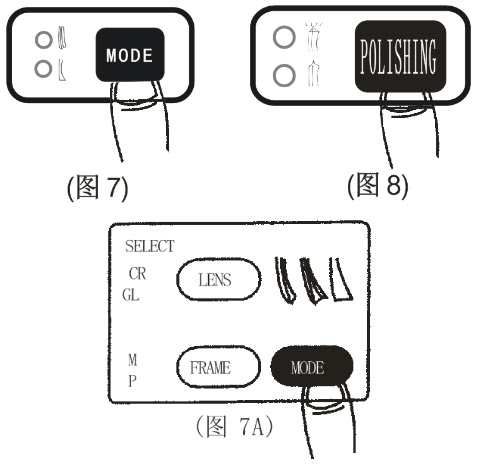
a.
Press MODE button to alternate modes between bevel
and rimless
Press MODE button to alternate modes between bevel
and rimless
b.
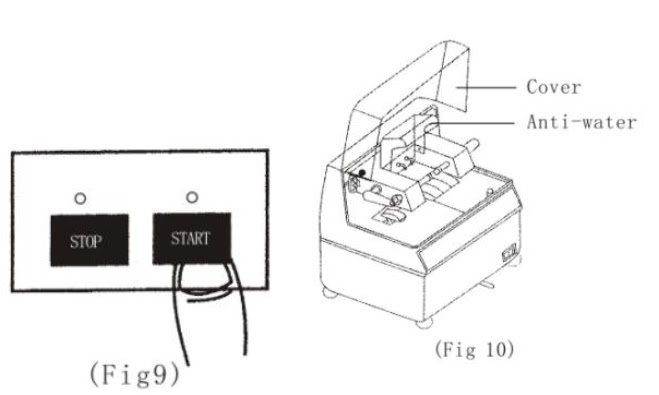
When “rimless” or “bevel” is selected, you can also
select polishing or not polishing functions(Fig 7 and Fig. 8)
When “rimless” or “bevel” is selected, you can also
select polishing or not polishing functions(Fig 7 and Fig. 8)
c.
When select the “rimless”, it will process rimless
lens polishing. If you do not want polishing, press “STOP” after the second
edger of lens and then the machine will come back to the beginning
position.(Fig.7A)
When select the “rimless”, it will process rimless
lens polishing. If you do not want polishing, press “STOP” after the second
edger of lens and then the machine will come back to the beginning
position.(Fig.7A)
NOTE:
1.
When polishing with “rimless” or “bevel”,you can
choose to turn on the light upside of the button “POLISHING”, the machine will
come back to the beginning position after finishing edging.
When polishing with “rimless” or “bevel”,you can
choose to turn on the light upside of the button “POLISHING”, the machine will
come back to the beginning position after finishing edging.
2.
When the machine is not polishing while “rimless”
or “bevel”, you can chose to turn on the light under the button “POLISHING”.
The machine will come back to the beginning position after finishing edging.
When the machine is not polishing while “rimless”
or “bevel”, you can chose to turn on the light under the button “POLISHING”.
The machine will come back to the beginning position after finishing edging.
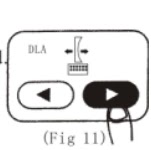
A. Start
·
Press START button and process will start
Press START button and process will start
·
Make sure waterproof is closed when edging lens
Make sure waterproof is closed when edging lens
·
Close sound proof cover.
Close sound proof cover.
H: Shifting lens position
·
Press
< and > button to move lens above gear wheel as desired.
Press
< and > button to move lens above gear wheel as desired.
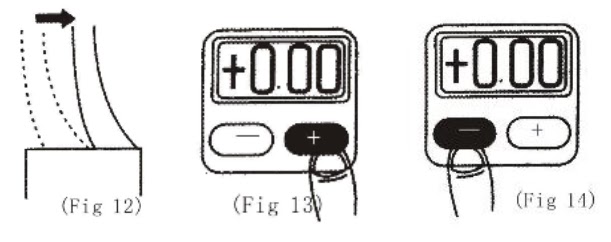
I: Changing lens size
· Use + button
to make the lens size larger if its size is smaller after its testing edging.
to make the lens size larger if its size is smaller after its testing edging.
· Use _ button to make the lens size smaller if its
size is bigger after its testing edging.
size is bigger after its testing edging.
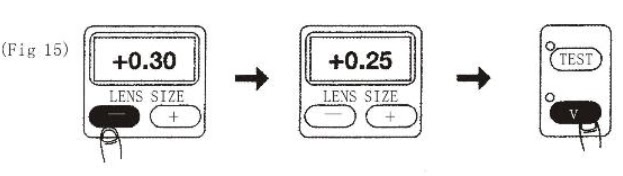
J: Re-edging
In case that the lens size is still larger after edging:
1.
(See Fig.
15): Press button to reset lens size
(See Fig.
15): Press button to reset lens size
2.
(See Fig
15): Press V button, and the machine will re-edge lens or the second wheel
according to the desired reducing size.
(See Fig
15): Press V button, and the machine will re-edge lens or the second wheel
according to the desired reducing size.
Advantages of automatic edging machine
1.
It is
very easy to operate
It is
very easy to operate
2.
It has
high accuracy and saves cost of labour
It has
high accuracy and saves cost of labour
3.
It saves
time can edge fast
It saves
time can edge fast
4.
It can
edge thick lenses with speed.
It can
edge thick lenses with speed.
5.
It can be
operated by someone who has less experience in working with optical equipment
It can be
operated by someone who has less experience in working with optical equipment
6.
It
provides multiple finishing operations on lenses.
It
provides multiple finishing operations on lenses.
Disadvantages
1.
It has a
high cost of purchase
It has a
high cost of purchase
2.
The
tracer machine can sometimes give an inaccurate size of the frame rim
The
tracer machine can sometimes give an inaccurate size of the frame rim
Precautions/maintenance
·
Put on
your lab coat before edging
Put on
your lab coat before edging
·
Avoid dry
edging
Avoid dry
edging
·
Remove
pump from the water after use
Remove
pump from the water after use
·
Switch
off the machine after use.
Switch
off the machine after use.
·
Clean
machine both in and outside of the body after use.
Clean
machine both in and outside of the body after use.
In today’s
modern world where accuracy, flexibility and effectiveness is an important
factor in the production of lenses, the automatic edging machine helps edging
lenses with very high accuracy.
modern world where accuracy, flexibility and effectiveness is an important
factor in the production of lenses, the automatic edging machine helps edging
lenses with very high accuracy.
References
Grey, D.S. (2008). The Inclusion of Tolerance
Sensitivities in the Merit Function for Lens Optimization, SPIE 147, 63–65.
Sensitivities in the Merit Function for Lens Optimization, SPIE 147, 63–65.
Feder, D. P. (2013). Automatic optical design, Appl. Opt. 2, 1209–1226
Fischer, R. & Paul.R. (2008). Optical system
design (2nd ed.). New York: McGraw-Hill. pp. 8, 179–198.
design (2nd ed.). New York: McGraw-Hill. pp. 8, 179–198.
Kingslake, R. (2010). Lens design fundamentals,Washington D. C.: Academic Press.
Shannon, R. (2007). The art and science of
optical design, Cambridge
University Press.
optical design, Cambridge
University Press.
Smith, W. J. (2012). Modern lens design,New York: McGraw-Hill, Inc.,