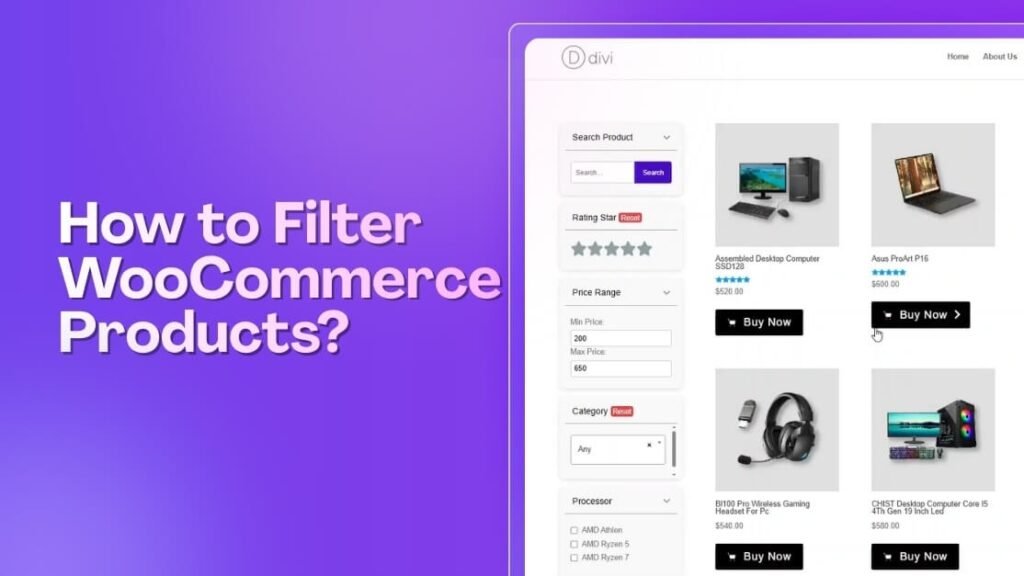
Finding the right product quickly can make or break a customer’s shopping experience. WooCommerce includes filters, but they often feel limited for growing stores. Better tools create smoother browsing, and many owners start thinking about how to filter WooCommerce products.
Use the Dynamic AJAX Product Filters plugin to add smart filters like price, color, size, stock status, and more. Just install the plugin, choose your filters, create attributes (like color or size), and display them on your shop sidebar. The filters load instantly without reloading the page, making shopping smoother and faster for visitors.
Want to learn the full setup in a simple way? Read on, because this article shows the steps, fixes common filter issues, and explains key tips so your store stays fast, clear, and helpful for shoppers.
Why Product Filters Are Important for WooCommerce Stores?
Product filters are essential for WooCommerce stores because they allow shoppers to quickly narrow down their choices. Instead of scrolling endlessly through hundreds of products, filters help customers find exactly what they need faster, saving time and reducing frustration during the shopping journey.
By improving navigation and simplifying product discovery, filters enhance the overall user experience. Customers feel more in control when they can refine searches by price, category, or attributes. This leads to higher satisfaction, fewer abandoned carts, and a smoother shopping process that encourages repeat visits.
Filters also directly contribute to increased sales and conversions. When shoppers can easily locate products that match their preferences, they are more likely to make purchases. Effective filtering reduces bounce rates, boosts engagement, and ensures customers stay longer on the store, exploring relevant items.
Types of Product Filters in WooCommerce
- Price filters: Enable users to set a price range or slider, helping them find products within their budget easily.
- Search filters: Allow keyword-based filtering so customers can refine product searches and quickly locate specific items they want.
- Category filters: Help customers browse products by categories such as clothing, electronics, or accessories, simplifying navigation and product discovery.
- Attribute filters: Based on product attributes like size, color, material, or brand, enabling precise product selection for customer needs.
- Rating filters: Customers can filter products by average star ratings, ensuring they view only highly rated and trusted items.
- Tag filters: Allow filtering by tags such as “eco-friendly” or “handmade,” helping customers find products with specific qualities.
- Stock status filters: Show only items currently in stock or exclude unavailable products, improving shopping efficiency and satisfaction.
How to Filter WooCommerce Products? (Step-by-Step Guide)
Product filters help visitors find the right product faster. People often search by things like price, color, size, rating, or stock status. WooCommerce has some basic filters, but they are quite limited and hard to customize.
That is why we will use a plugin called Dynamic AJAX Product Filters for WooCommerce. It works without coding and comes in both free and paid versions. You can choose based on your needs.
Using this Woocommerce Ajax product filter plugin makes the entire filtering experience faster and more enjoyable for your customers. Since the filters update products instantly without reloading the page, visitors can browse through different price ranges, colors, or categories much more easily. This not only saves time but also helps shoppers stay focused on finding the right product instead of waiting for pages to refresh.
Step 1: Install the Product Filter Plugin
You can install either the free version or the Pro version. The free version is enough for most stores.
Installing the free version
- Go to WordPress Dashboard → Plugins
- Click Add New Plugin
- In the search box, type: Dynamic AJAX Product Filters for WooCommerce
- Click Install Now, then Activate
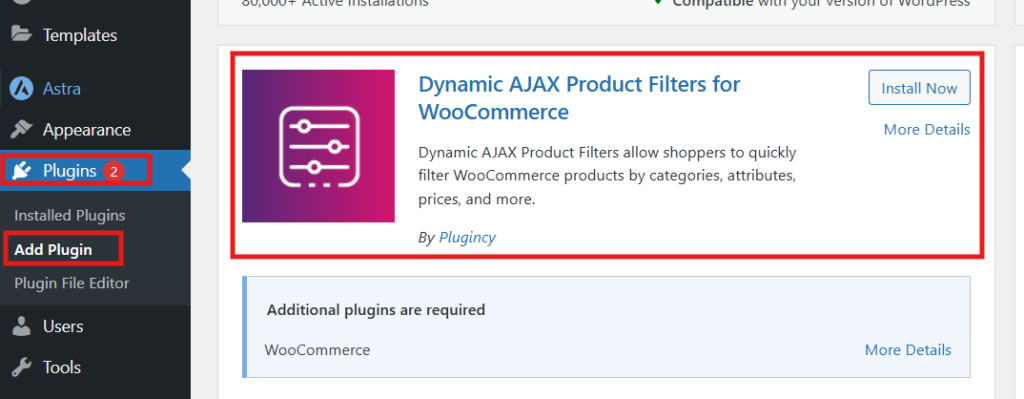
The plugin is now active on your store.
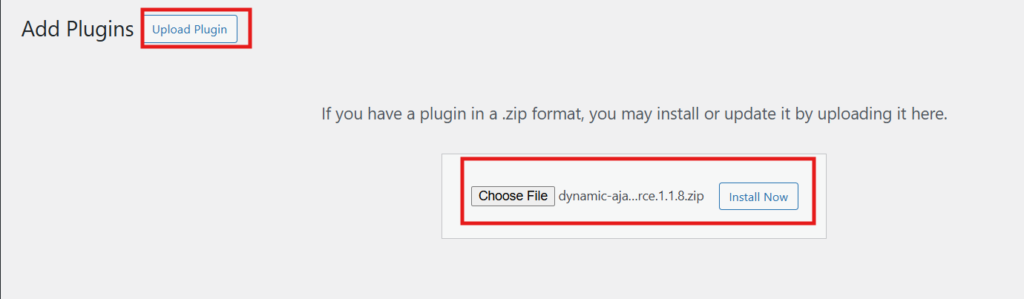
Installing the Pro version
If you purchase the Pro version, you will receive a ZIP file.
- Go to Plugins > Add New Plugin
- Click Upload Plugin, choose the ZIP file
- Click Install Now, then Activate
You will also receive a license key in your email.
To activate it:
- Go to Product Filters → Plugin License
- Paste the key and click on Activate
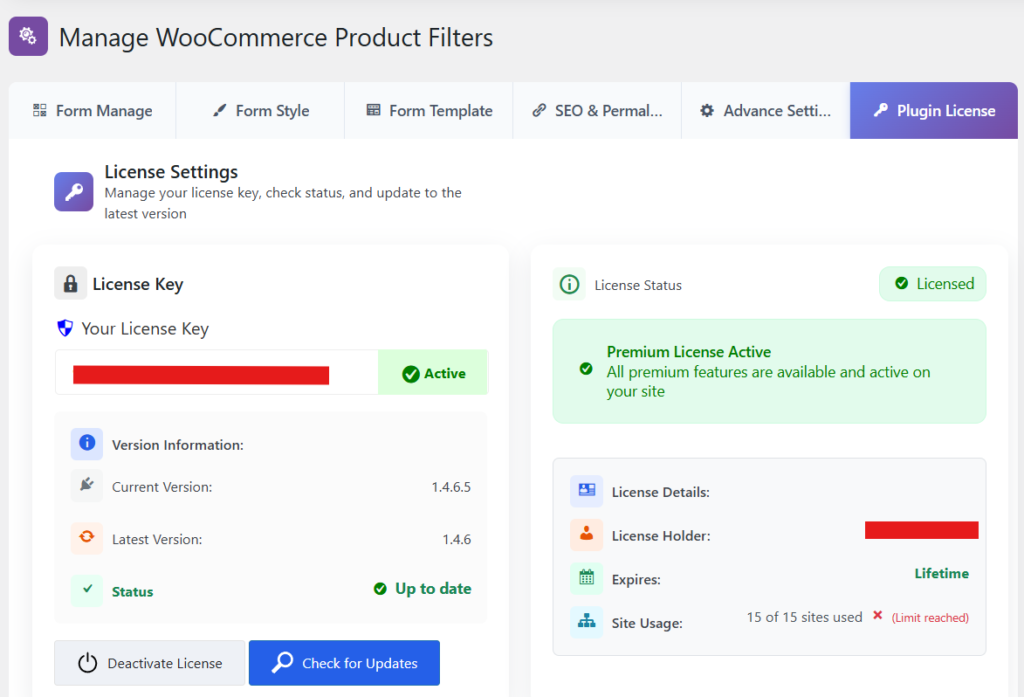
Now, the Pro features will be unlocked.
Step 2: Decide Which Filters You Want to Add
Before adding filters, think about what your visitors actually use. For most stores, these are the common ones:
- Search box
- Price filter
- Category filter
- Attribute filters like color or size
- Rating filter
- Tag filter
- Stock status filter
You can always add or remove filters later, so no need to worry.
Step 3: Create and Enable Your Filters
Now we will actually turn on the filters in the plugin.
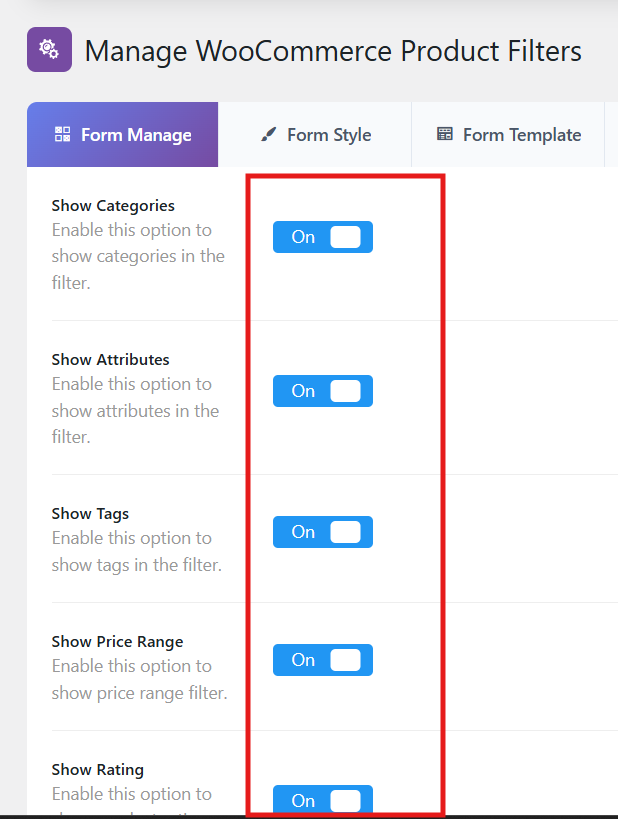
Go to your WordPress dashboard. Then go to Product Filters > Form Manage
You will see many filter types here. Turn on the ones you want for your store.
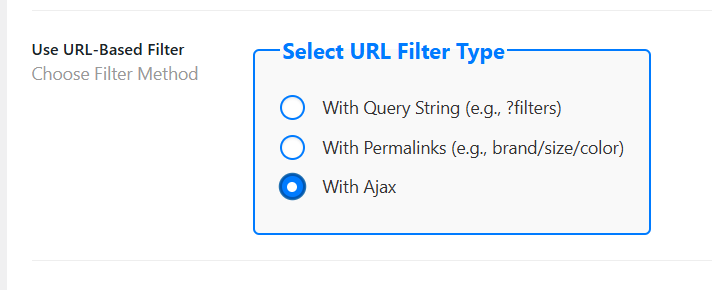
You will also see a setting called “Select URL Filter Type.” If you want smooth filtering without page reloads, choose “with Ajax”. This makes the page update instantly when filters change.
After selecting your filters, click Save Changes.
At this point, filters exist, but some of them need extra setup, especially:
- attributes
- categories
- tags
- stock status
Let’s finish those next.
Step 4: Create Attributes Like Color or Size
Attributes control things like color, size, material, length, and so on. Go to Products → Attributes
Here you:
- Write the attribute name (Example: Color)
- Add slug
- Add description if needed
- Click Add attribute
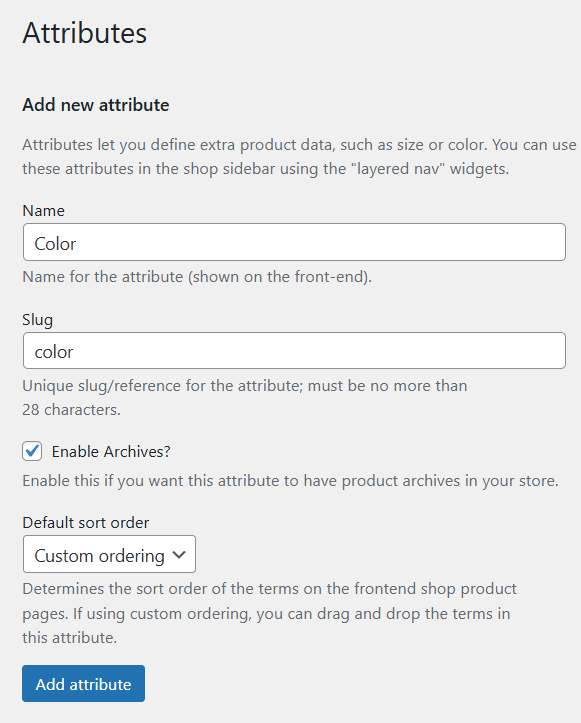
Your attribute is created, but now you must add its values.
Click Configure terms for that attribute. Then add things like:
- Red
- Blue
- Green
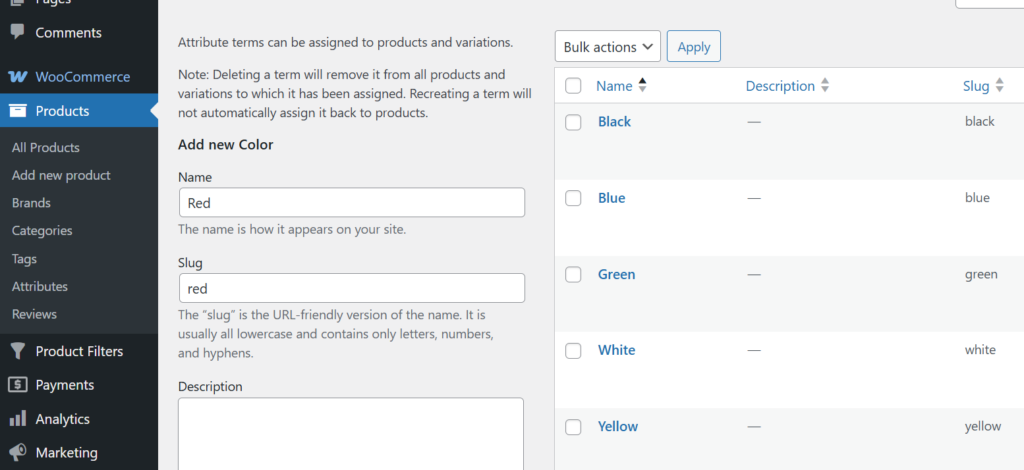
If creating size instead of color, add:
- S
- M
- L
- XL
- XXL
Adding Category and Tag is also similar to the Attributes.
Make sure you assign all these filters to products according to their category, tag, and attributes.
Step 5: Set Stock Status for Products
Stock filters only work if products have the correct stock status set.
- Go to Products → All Products
- Click Edit
- Scroll to Product Data
- Click the Inventory tab
- Set Stock status to:
- In stock
- Out of stock
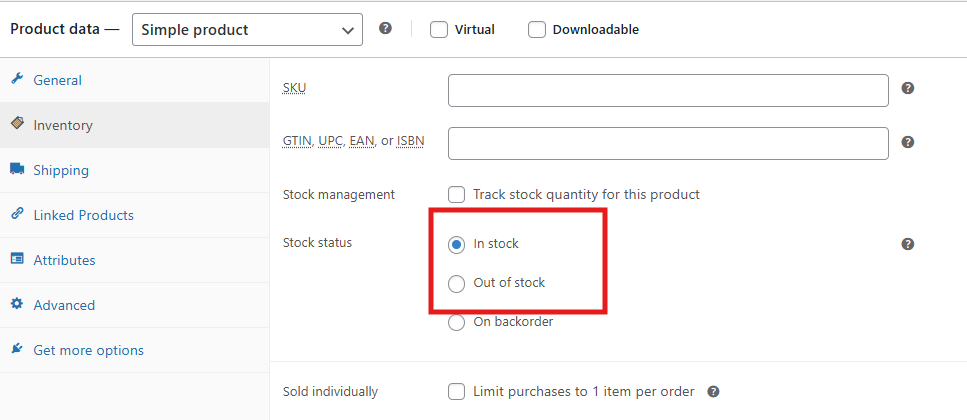
Click Update after you finish.
Step 6: Display Filters on the Shop Page
Right now, filters exist, but they are not visible in your store. So now we will display them.
Go to: Appearance → Widgets
Then:
- Find WooCommerce Sidebar
- Click the + icon and search for Dynamic Ajax Filter
- Add it, then click Update
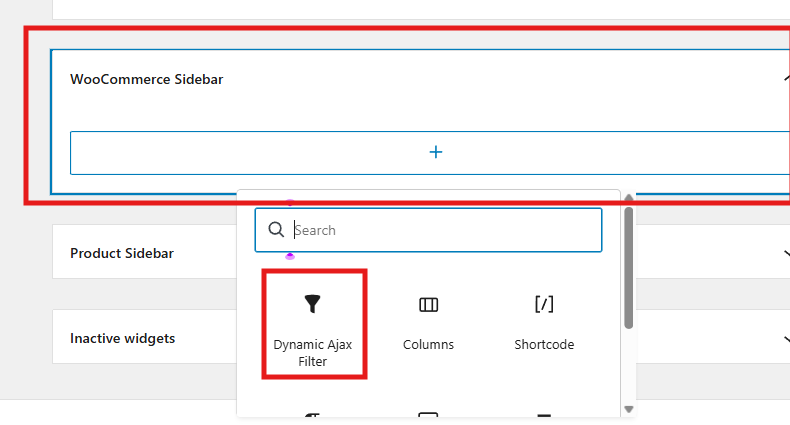
Your filters will now show on the shop sidebar.
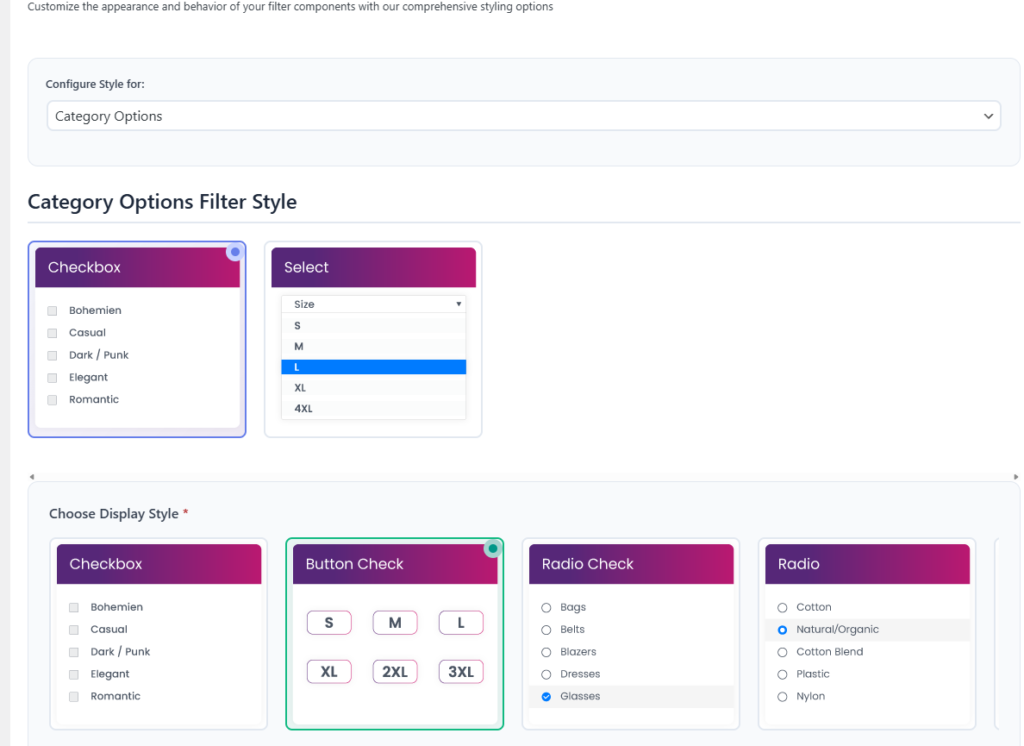
Step 7: Style and Customize the Filters
You may want filters to look nicer or match your theme. The plugin lets you do that easily.
Go to Product Filters → Form Style. Here you can customize how the filters will look and their display style. Pick the style you like and click Save Changes.
Now your WooCommerce store has active product filters that:
- Load instantly with Ajax
- Help customers find items faster
- Allow search by price, attribute, stock, category, rating, and more
WooCommerce Filter Issues and How to Fix Them
Products can be sorted by price, size, color, and other criteria using WooCommerce filters. When they break, the shop becomes hard to use, and sales can drop. The good thing is that most filter problems come from simple settings or conflicts that can be fixed. These are the issues you may face:
- Filters do not work or stay stuck
- Wrong products show after filtering
- Filters disappear from the page
- Price filter does not behave correctly
- Category filter shows every product
- AJAX filters do not refresh the list
Fix For Filters Not Working
Sometimes filters stop working because of outdated tools, conflicts, or heavy caching. The good news is that these problems are usually simple to fix. Follow these steps slowly and test after each one so you can see what changed.
Update Everything
Make sure WordPress, WooCommerce, and the filter plugin are fully updated. Older versions create bugs and break features like filters. Update one item at a time, test the page, and keep notes. If something breaks after an update, roll back and try again carefully.
Clear All Caches
Cache stores old pages and can hide real changes. Clear your cache plugin, hosting cache, CDN cache, and your browser cache. Refresh the shop page and try the filters again. Many times, the filters start working right after the cache is cleaned out completely.
Test With A Default Theme
Themes sometimes override shop pages and stop filters from loading correctly. Switch to a basic WooCommerce-friendly theme for testing. If filters begin working again, the problem is inside the theme. Contact the theme developer or look for updates that fix compatibility problems.
Disable Other Plugins
Another plugin may be blocking the scripts the filters need. Turn off all plugins except WooCommerce and the filter plugin. Test the filter. Turn plugins back on one by one. When the filters break again, you will find the plugin that is causing the conflict on your site.
Rebuild WooCommerce Data
When product data gets out of sync, filters cannot find items correctly. Open WooCommerce status tools and run recount terms, clear transients, and regenerate product lookup tables. After running these tools, refresh your shop page and check if filtering now works properly.
Check Filter Widget Placement
Filters need to be inside the correct widget area to work correctly. Go to Appearance widgets and place the filter widgets in the sidebar used by your shop page. Save the layout, reload the shop, and click each filter to confirm everything appears and updates as expected.
Best Ways to Make WooCommerce Product Filters Mobile Friendly
Mobile users need filters that are simple, clear, and quick to use. Good design makes shopping easier, keeps people engaged, and helps them find products faster without confusion or wasted effort. Here are some effective ways to make these filters mobile-friendly.
- Use a Slide-Out Panel: Place filters in a hidden side panel that slides out when tapped, keeping the main product list visible and uncluttered.
- Add Sticky Filter Buttons: Keep a small filter button fixed at the bottom of the screen so users can open filters anytime without scrolling back up.
- Show Clear Icons: Use simple icons like sliders or checkboxes with short labels so users can quickly understand each filter option without reading long text.
- Keep Filter Groups Short: Limit each filter group to a few key choices so users do not feel overwhelmed by too many options on small screens.
- Use Collapsible Sections: Place filters in collapsible sections that expand only when tapped, saving space and keeping the layout clean for mobile browsing.
- Highlight Active Filters: Display chosen filters at the top of the product list so users can see what is applied and remove them quickly if needed.
- Make Buttons Large Enough: Ensure filter buttons and checkboxes are big enough to tap easily with fingers, reducing mistakes and improving mobile usability.
Smart mobile filters make shopping faster and easier. Clear layouts, simple buttons, and short groups keep users happy. Good design helps people find products quickly and enjoy browsing on phones or tablets.
How to Test WooCommerce Product Filters Before Publishing?
Product filters help shoppers find items faster and with less effort. Broken filters can confuse users and hurt sales badly. Testing filters before publishing saves time and avoids user problems. Follow the steps below to check results and speed.
Check If Filters Show Correct Products
Start by selecting one filter option at a time. Check if the product list changes correctly. Match results with product tags, prices, or categories. Try several combinations to confirm accuracy. If wrong items appear, review product settings and filter rules before moving forward.
Test Multiple Filter Combinations
Use two or more filters together during testing. For example, select price and color at once. The results should match all chosen options. If products do not update correctly, something is wrong. Testing combinations helps ensure filters work well in real shopping situations.
Confirm Filters Update Without Page Reload
Apply filters and watch how the page reacts. Results should change quickly without full reloads. Slow updates can frustrate users. Test on desktop and mobile screens. If pages reload often, review filter settings or plugin options to improve the shopping experience.
Check Filter Speed On Different Devices
Open the store on a phone, tablet, and computer. Apply filters and note loading time. Filters should respond fast on all devices. Slow speed may signal heavy scripts or a poor setup. Fix speed issues early so shoppers do not leave due to delays.
Review Empty And Edge Case Results
Try filter options that should show a few or no products. The store should display a clear message, not errors. Empty results help users adjust choices easily. Testing edge cases ensures filters handle all situations and keep the store clean and user-friendly.
Testing WooCommerce filters avoids mistakes before shoppers ever see them. Correct results and fast speed build trust quickly. A few checks now prevent bigger issues later. Test carefully, then publish with confidence and peace of mind.
Final Thought
Strong filters keep shoppers moving, cut confusion, and reduce clicks. With a simple plugin, clear attributes, smart widgets, and Ajax updates, your store shows the right items fast and keeps buyers happy, and that is how to filter WooCommerce products.
Keep filters tidy on mobile, clear cache after changes, and test combinations before publishing. Watch speed on slow devices, avoid cluttered choices, and use simple labels. Small checks make shopping smooth. Good luck building a store people enjoy.