Picture this: your child comes home after a dental filling or tooth extraction, holding their cheek and fighting back tears. As a parent, you want to help immediately, but reaching for medication every time feels like an incomplete answer. Managing dental pain in children requires solutions that are both effective and gentle enough for young, sensitive bodies.
Red LED light therapy has emerged as a promising, non-invasive option that parents and dental professionals are increasingly turning to for post-procedural pain relief. By harnessing specific wavelengths of red light, this therapy works at the cellular level to reduce inflammation and support the body’s natural healing process — without needles, chemicals, or discomfort. Devices like the YouLumi red LED light therapy device make this technology accessible right at home, putting meaningful pain management tools directly in parents’ hands.
This article is designed to give you clear, practical, and safety-focused guidance on using red LED therapy for your child’s dental pain. From understanding the science behind the treatment to applying it correctly at home, you’ll find everything you need to approach your child’s recovery with confidence.
Understanding Red LED Light Therapy for Dental Pain Management
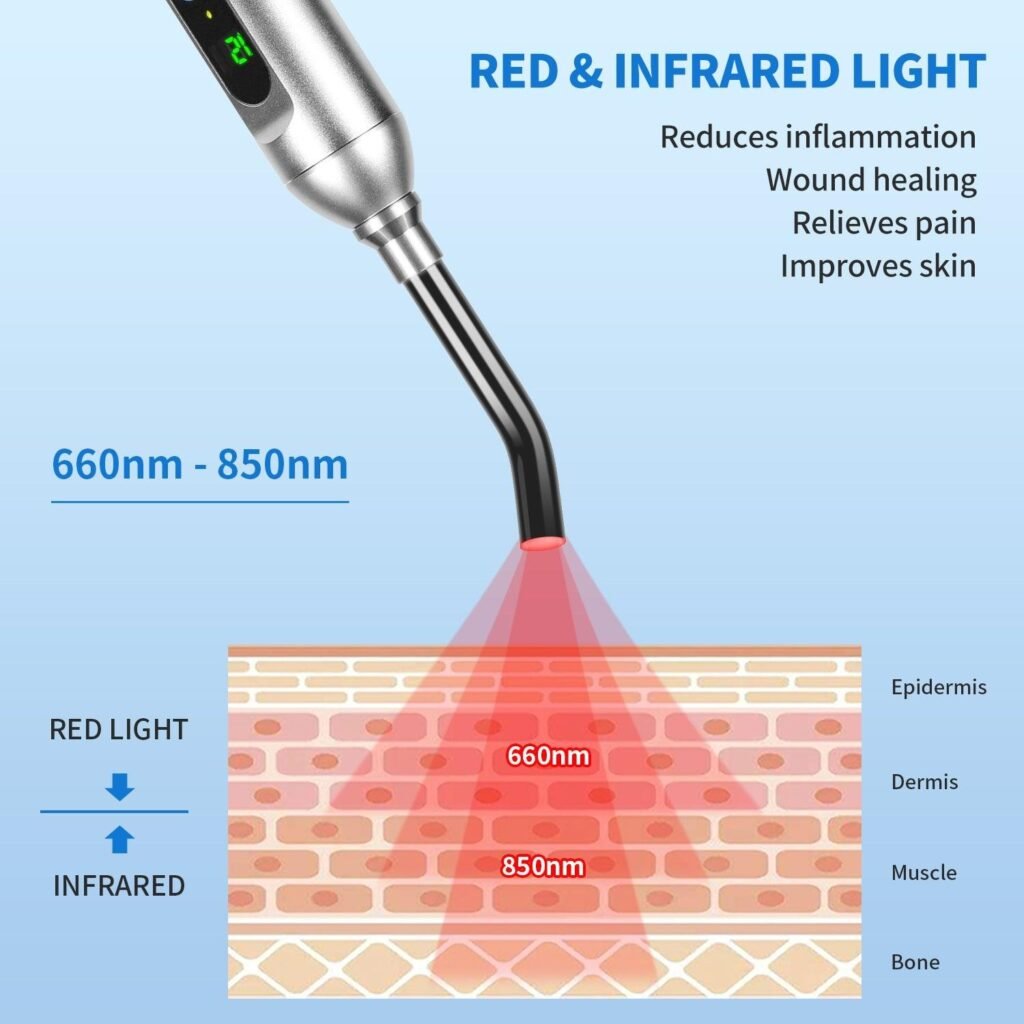
Red LED light therapy, also known as photobiomodulation, uses specific wavelengths of red light — typically between 630 and 700 nanometers — to penetrate soft tissue and trigger biological responses at the cellular level. Unlike ultraviolet light, which can damage skin, red light wavelengths are gentle enough to be absorbed safely by human tissue without generating heat or causing harm. This makes the therapy particularly well-suited for children, whose bodies are more sensitive than adults’.
At its core, the therapy works by stimulating mitochondria, the energy-producing structures inside cells. When red light reaches these structures, it boosts adenosine triphosphate (ATP) production — essentially accelerating the cell’s natural repair functions. In the context of dental pain, this translates to faster reduction of localized inflammation, decreased nerve sensitization, and quicker tissue regeneration around treated areas like extraction sites or post-filling gum irritation. The result is a measurable reduction in both pain intensity and recovery time.
What sets red LED therapy apart as a child-friendly solution is its entirely non-invasive nature. There are no medications involved, no skin penetration, and no reported systemic side effects when used correctly. Children who are already anxious from a dental visit don’t face any additional discomfort during treatment — sessions are quiet, still, and over within minutes. Clinical studies on photobiomodulation have shown consistent results in reducing oral pain and swelling, and dental professionals in pediatric settings have increasingly incorporated it as a complementary recovery tool.
For parents, the key advantage is confidence: red LED therapy supports the body’s existing healing process rather than masking pain with chemicals. It’s a proactive, science-backed approach that works alongside standard post-dental care, giving children a more comfortable and supported recovery from start to finish.
Key Device Features for Precise Treatment Control
When it comes to using red LED therapy on children, having a device that offers reliable control and clear feedback isn’t just convenient — it’s essential. A well-designed red LED therapy device should combine approachable usability with the kind of precision that makes treatment both effective and safe for younger users.
At the center of effective device design is a digital display, which provides real-time monitoring throughout each session. Parents can see exactly what’s happening during treatment — session time, light intensity, and operational status — without guesswork. This transparency is particularly valuable when managing a child’s comfort, since you can make adjustments mid-session rather than waiting until something feels off. The display removes ambiguity from the process, giving caregivers immediate, readable confirmation that the device is functioning as intended.
Quality devices also feature customizable treatment control settings that allow users to tailor each session to their child’s specific needs. Intensity levels can be adjusted to account for a younger child’s lower tolerance, while timer functions help parents maintain consistent session lengths without needing to watch the clock manually. This level of control means you’re not applying a one-size-fits-all approach — you’re adapting each treatment based on your child’s age, the severity of their discomfort, and how they’re responding in the moment.
Compact and lightweight construction is equally important, as the device needs to be easy to hold and maneuver when working around a child who may be fidgety or sensitive after a dental procedure. A straightforward interface means minimal setup time, so treatment can begin quickly when your child needs relief most.
Safe Application Techniques for Children Using Red LED Therapy
Applying red LED therapy to a child requires a thoughtful approach that prioritizes comfort, safety, and precision. Because children’s skin and tissues are more responsive than adults’, following clear guidelines around device placement, session length, and age-appropriate settings is the foundation of effective treatment.
For most children, sessions should be kept short — typically between three and five minutes per targeted area. Younger children under six may benefit from even briefer exposures closer to the two-to-three minute range, while older children can tolerate slightly longer sessions. Never apply the device directly to the eyes, and always confirm the treatment area is clean and dry before beginning. If your child has any open wounds, active infection, or persistent swelling that wasn’t discussed with their dentist, pause and consult a healthcare professional before proceeding.
Parental supervision is non-negotiable throughout every session. Children should remain still, but staying calm and engaged alongside them — whether that means holding their hand or talking them through what’s happening — makes the experience far more manageable. Using a soft cloth or thin barrier over sensitive skin near the treated area can add an extra layer of comfort without blocking the light’s effectiveness.
Step-by-Step Guide to Using a Red LED Device on Children
Start with a pre-use check: ensure the device is fully charged, the lens is clean, and all settings are reset to their lowest defaults. Seat your child in a comfortable, well-lit position where you have clear access to the affected side of their face or jaw.
Position the device approximately half an inch from the skin surface over the affected area — close enough for optimal light penetration, but not pressing against tender tissue. Use the digital display to select an appropriate intensity level, starting low and increasing only if your child is comfortable. Set the timer for the appropriate session length based on your child’s age and the treated area.
During the session, monitor the display for real-time status confirmation and watch your child’s facial cues. If they show signs of discomfort, reduce intensity immediately. Once the session ends, gently clean the device lens with a dry cloth, and check the treated area for any unusual redness or swelling. Note your child’s response in a simple log — this helps you refine settings across future sessions and gives your dentist useful context at follow-up visits.
Implementing Red LED Therapy for Post-Dental Treatment Pain Relief
After procedures like tooth extractions, fillings, or orthodontic adjustments, the hours and days that follow are when children tend to feel the most discomfort. Swelling peaks, nerves remain sensitized, and the tissue surrounding the treated area begins its repair process. This is precisely where red LED therapy delivers its most practical value — not as a replacement for professional aftercare, but as a consistent daily tool that actively supports recovery.
For extraction sites, beginning therapy within 24 hours of the procedure can meaningfully reduce swelling and tissue inflammation. Apply the device to the external cheek over the affected area once per day for the first three days, keeping sessions within the age-appropriate time range established during your initial use. For filling-related gum soreness or sensitivity, a single daily session targeting the jaw area near the treated tooth often brings noticeable relief within two to three days. The goal is regularity — short, consistent sessions yield better outcomes than sporadic longer ones.
Red LED therapy works most effectively when paired with complementary post-care steps. Encourage your child to eat soft foods, avoid touching the treated area with their tongue, and maintain gentle oral hygiene as directed by their dentist. Therapy sessions fit naturally into an evening routine, ideally after meals and tooth brushing when the area is clean and your child is settled. This pairing of good hygiene practice with targeted light therapy creates a recovery environment where tissue can heal efficiently from multiple angles.
Parents who have integrated red LED therapy into post-dental recovery routines frequently report that children show less reluctance at follow-up appointments — a sign that their recovery experience was more manageable overall. While individual responses vary, the consistent finding across clinical observations is that photobiomodulation shortens the window of acute discomfort, helping children return to eating, speaking, and sleeping normally sooner than with rest alone.
Supporting Your Child’s Dental Recovery with Red LED Therapy
Red LED light therapy offers parents a meaningful way to support their child’s comfort during one of childhood’s more challenging experiences — dental recovery. Its non-invasive nature, combined with a strong foundation in cellular science, makes it a genuinely child-appropriate tool rather than a workaround or trend. There are no medications, no discomfort during application, and no recovery time from the therapy itself — just targeted light working alongside your child’s natural healing process.
Purpose-built devices with digital displays, adjustable treatment control settings, and compact designs give parents the confidence to apply therapy consistently and safely, adapting each session to their child’s individual needs. Whether you’re managing post-extraction swelling or easing sensitivity after a filling, the ability to fine-tune treatment in real time makes a genuine difference in outcomes.
That said, red LED therapy is always most effective as part of a broader care plan. Consult your child’s dentist or pediatrician before starting treatment, especially after complex procedures. With professional guidance and a consistent home routine, you can give your child a recovery experience that is calmer, faster, and far more comfortable.