Living or working in Calgary means occasionally dealing with weather extremes, construction challenges, and older buildings. As a result, property damage and environmental hazards like mold, asbestos, or fire residue are not uncommon. That is why remediation is such a critical part of maintaining safe and livable conditions. It’s more than just cleanup. It’s a structured, technical process that focuses on identifying the hazard, stopping the spread, restoring the area, and preventing future issues.
At Top of the Line, we’ve spent years working inside Calgary properties, helping both homeowners and business owners recover quickly and safely. Therefore, we’ve developed a clear, thorough process that anyone can follow or better understand before hiring professionals.
Step 1: Assessing the Damage
The first step in any remediation process is the initial assessment. We walk through the property to identify all affected areas. That includes checking walls, ceilings, attics, basements, or even crawl spaces for any signs of moisture, staining, air quality changes, or odd smells.
To clarify, we’re not just looking at what’s visible. Many problems hide beneath surfaces or behind walls. For instance, mold might appear as a small stain, but behind drywall, it could be thriving. We use moisture meters, thermal imaging, and air quality testing to get a complete picture. Above all, it’s important to take this step seriously because accurate diagnostics shape the entire remediation plan.
Step 2: Planning the Remediation Strategy
After identifying the problem, we create a detailed remediation strategy. Every home or commercial space is different, so we tailor the plan to match the scale, urgency, and specific risks involved. For example, asbestos in an older commercial structure requires a completely different containment setup than mold in a basement suite.
Most importantly, we determine how to prevent cross-contamination during the work. That might include setting up HEPA-filtered negative air machines, sealed containment zones, and safety barriers. In addition, we plan for how to access difficult areas without creating more mess or damage. Planning helps reduce surprises and allows you to stay in the loop with clear timelines and expectations.
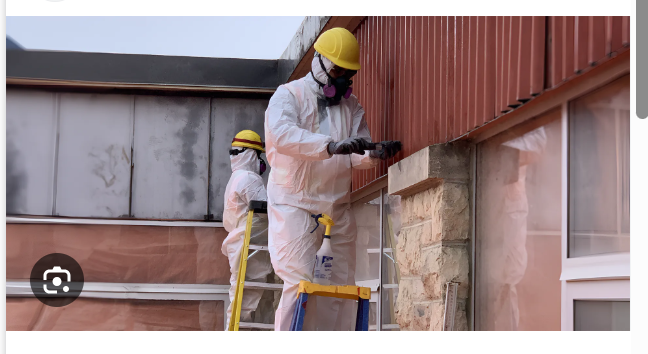
Step 3: Containing the Affected Area
Once the plan is in place, we move to the containment phase. This is a crucial part of the process, especially when dealing with airborne contaminants like mold spores or asbestos fibers. These materials can travel through vents, doors, and even small gaps. Consequently, we seal off the work area using plastic sheeting, zipper doors, and commercial-grade air scrubbers.
During containment, we also remove or protect anything not affected. That is to say, we clear out furniture, equipment, or inventory and make sure clean spaces remain untouched. Likewise, in homes, we work with property owners to ensure their belongings are safe and disruption is minimized. Our goal is always to treat the space with care and avoid any additional risk.
Step 4: Removing Contaminated Materials
The removal phase is often the most visible and intensive part of remediation. We extract materials that can’t be saved such as drywall, flooring, ceiling tiles, insulation, or even cabinetry, depending on the situation. However, not everything needs to be tossed. Some items can be cleaned and restored if the contamination hasn’t penetrated deeply.
This is also the stage where many people begin to notice the scale of the issue. For instance, a small leak behind a water heater could lead to widespread mold across an entire wall cavity. As a result, we always encourage property owners to act fast when signs of moisture or odors first appear. The sooner we can begin remediation, the more we can save.
Step 5: Cleaning and Sanitizing
After demolition and removal, we move into deep cleaning and disinfection. This step ensures that any remaining particles, microbes, or residues are completely eliminated. We use EPA-approved antimicrobial solutions, HEPA vacuums, and pressure-treated fogging machines depending on the nature of the hazard.
In the case of fire damage, we also remove soot, smoke staining, and odor from surfaces and ventilation systems. That is to say, it’s not just about appearance. Smoke residue can be corrosive and dangerous if left untreated. In mold cases, air testing is often repeated at this point to confirm that spore levels have returned to normal.
Step 6: Restoration and Repair
Once the space is clean and safe, we shift into rebuilding. This is where we replace everything that was removed—drywall, flooring, paint, trim, fixtures, or whatever else was affected. In commercial properties, that might include reinstalling shelving, workstations, or ceiling panels.
Certainly, the goal here is to return the property to its pre-damage condition or better. We also offer guidance to prevent future problems. For example, if we discovered a leak behind a bathroom wall that caused mold growth, we’ll suggest a better waterproofing method or ventilation upgrade before closing up the space again.
Step 7: Final Inspection and Preventive Advice
Before calling the job complete, we always perform a final inspection. That includes air quality checks, visual inspections, and client walkthroughs. In other words, we make sure the issue has been fully resolved and everything is safe to use again. We also review preventive measures you can take moving forward.
For instance, adding dehumidifiers in moisture-prone areas or improving insulation around water pipes can go a long way. Most importantly, we explain the signs to watch for in the future. That way, you can act early before a minor issue grows into a larger, more expensive one.
When to Reach Out for Help
Not all damage requires immediate remediation, but many situations do. If you smell mustiness, see water stains, find visible mold, or suspect asbestos in building materials, it’s best to consult professionals right away. These issues can escalate quietly, often without causing major disruption at first.
If you’re dealing with recurring leaks, a history of previous flooding, or live in an older property, you should consider scheduling a general inspection. That gives you a baseline understanding and helps you plan for potential risks. We’re always ready to guide you through what to expect, what can be done, and what steps are truly necessary.
To learn more about remediation services in Calgary, you can explore in-depth guidance based on real cases and solutions.
Extra Tip: Don’t Ignore HVAC Systems
A detail often overlooked in remediation is the role of HVAC systems. Air conditioners, furnaces, and ducts can carry mold spores, smoke particles, or even asbestos dust to other areas of the property. Therefore, part of our process includes assessing and cleaning your ventilation network. This step helps protect air quality long after the cleanup is done.
It’s especially important in commercial settings, where centralized air circulates between multiple rooms or floors. Likewise, in homes, a contaminated furnace filter can undo a lot of remediation progress if not addressed early. Ask about HVAC inspections during your consultation. It can make a bigger difference than many people realize.
Ready to Take the Next Step?
If you suspect damage or need expert help evaluating your property, the best place to start is by speaking with a trained technician. You can contact us to book an assessment, ask questions, or get a second opinion. We’re here to walk through the issue step-by-step and make sure you understand every part of the process before moving forward.
Frequently Asked Questions
How long does the average remediation take?
Most residential projects take three to seven days depending on the extent of damage. Larger commercial spaces or those with structural issues may take several weeks.
Can I stay in my home during remediation?
That depends on the type of hazard. For minor mold remediation, containment allows people to stay in unaffected areas. However, for asbestos or major fire damage, temporary relocation is usually recommended.
What are signs I might need remediation?
Watch for musty smells, persistent allergies, visible discoloration, sagging drywall, or unexplained water stains. Any past flooding or leaks should also prompt an inspection.
Is remediation covered by insurance?
Many insurance policies do cover remediation when it’s tied to sudden events like a pipe burst or storm damage. It’s important to check your policy or speak with your provider directly.
How do I prevent mold from coming back?
Keep humidity levels below 50 percent, fix leaks immediately, ensure proper ventilation in kitchens and bathrooms, and use moisture-resistant materials in high-risk areas. Regular inspections help too.